

How disks are erased
How the agent picks the erasure for each disk, which disks it refuses, what you accept at the confirmation screen, and how it checks the result.
You never choose an erasure method. For each disk, the agent picks the strongest erasure it can run on that hardware, and the same disk always gets the same choice. The proof records what was chosen and why.
Two levels of guarantee
The agent follows the NIST SP 800-88 standard, which defines two levels:
| Level | What it protects against | How the agent reaches it |
|---|---|---|
| Purge | Recovery in a laboratory, with specialized equipment | The disk's own erase command (firmware erase), on NVMe SSDs only in R1 |
| Clear | Recovery with ordinary software that reads the disk | The agent writes over every block of the disk itself |
The agent always aims at Purge. When the disk offers no Purge method that this release runs, it falls back to Clear. In the current release (R1), that means every disk except an NVMe SSD is erased at Clear, and you accept that lower guarantee for each disk before anything is erased (see Confirm the erasure). The next releases bring Purge to SATA and SAS disks: see What each kind of disk gets.
The level of detail you choose for the record (minimal or full NIST SP 800-88) changes the information the proof asks for, never the erasure.
What each kind of disk gets
| Disk | Erasure | Level | Version |
|---|---|---|---|
| NVMe SSD | Sanitize block erase, if the SSD offers it | Purge | R1 |
| NVMe SSD without it | Format with secure erase, if it reaches the whole SSD | Purge | R1 |
| NVMe SSD with neither | Overwrite, one pass | Clear | R1 |
| SATA or SAS hard disk | Overwrite, one pass of zeroes, or three passes if asked | Clear | R1 |
| SATA or SAS SSD, hybrid disk | Overwrite, always one pass | Clear | R1 |
| SATA SSD | ATA Sanitize | Purge | R2 |
| SATA hard disk | ATA Sanitize, or ATA Secure Erase (enhanced) when the disk has no Sanitize, after clearing the areas it can hide (HPA, DCO, AMA) | Purge | R2 |
| SAS hard disk or SSD | SCSI Sanitize | Purge | R2 |
| Disk behind a RAID controller | Controller switched to pass-through automatically, then as above | As above | R2 |
| Self-encrypting drive (Opal, Ruby, Enterprise) | Erasure through the drive's own encryption | Purge | R3 |
| eMMC, SD card | Supported | R3 | |
| SSD behind a USB adapter | Accepted once the adapter is tested to pass the commands through (refused before) | R3 |
R1 is the current release. R2 is planned for 11 December 2026 and R3 for 11 February 2027; these dates are indicative. Not scheduled: Sanitize crypto erase and Sanitize overwrite on NVMe, pass counts other than one or three.
Overwrite means the agent writes over every block of the disk itself. By default it writes one pass of zeroes, which is what NIST SP 800-88 asks for Clear. On a hard disk you can ask for three passes (DoD 5220.22-M): a random byte, its complement, then random data. No standard in force requires three passes; the option exists for organizations whose own rules ask for it.
On an SSD or a hybrid disk, an overwrite cannot reach the spare areas the disk manages by itself, so more passes would add nothing: the agent writes one pass and says so in a warning.
SSDs split into several namespaces
An NVMe SSD can be divided into several parts, called namespaces, each shown as its own disk.
One firmware erase reaches all of them at once. So when you select one, the agent selects the
others, shows Same SSD as <others>: erased together by one command (Purge), and erases them
together. Each part is still checked and recorded separately.
If you leave one part out, the others can no longer use the firmware erase, which would reach it
too: they are overwritten at Clear instead, with the reason
another namespace of this SSD is not erased with it: a firmware erase reaches it.
Non-interactive mode refuses such an SSD (namespace group incomplete: erase it in interactive mode).
An SSD split into several namespaces uses one license, whatever the number of its namespaces.
Disks the agent never offers
Some disks appear in the list marked [-], with the reason after their name. You cannot select
them: typing their number is refused with This disk cannot be selected: its line says why.
| Reason shown | What it is |
|---|---|
boot medium | The stick or DVD the agent started from |
Exaion medium | Another Exaion Wipe medium, such as the reports key |
boot medium unknown | The agent could not tell which device it started from (see below) |
no medium: insert one, then detect again | An empty drive: card reader, optical or floppy drive |
unreadable: check its connection, then detect again | The agent could not read the disk to check it |
no stable identity | The disk gives no serial number or identifier the proof can rely on |
When the agent cannot tell which device it started from, it keeps every disk excluded and shows
Warning: boot medium not identified, disks stay excluded. u to lift. Type u, then y, only
if you know which device the agent started from and will not select it. The confirmation screen
then says Boot medium not identified: its exclusion was lifted by the operator, and the proof
records it. Non-interactive mode never lifts it: it refuses to start.
Disks refused at confirmation
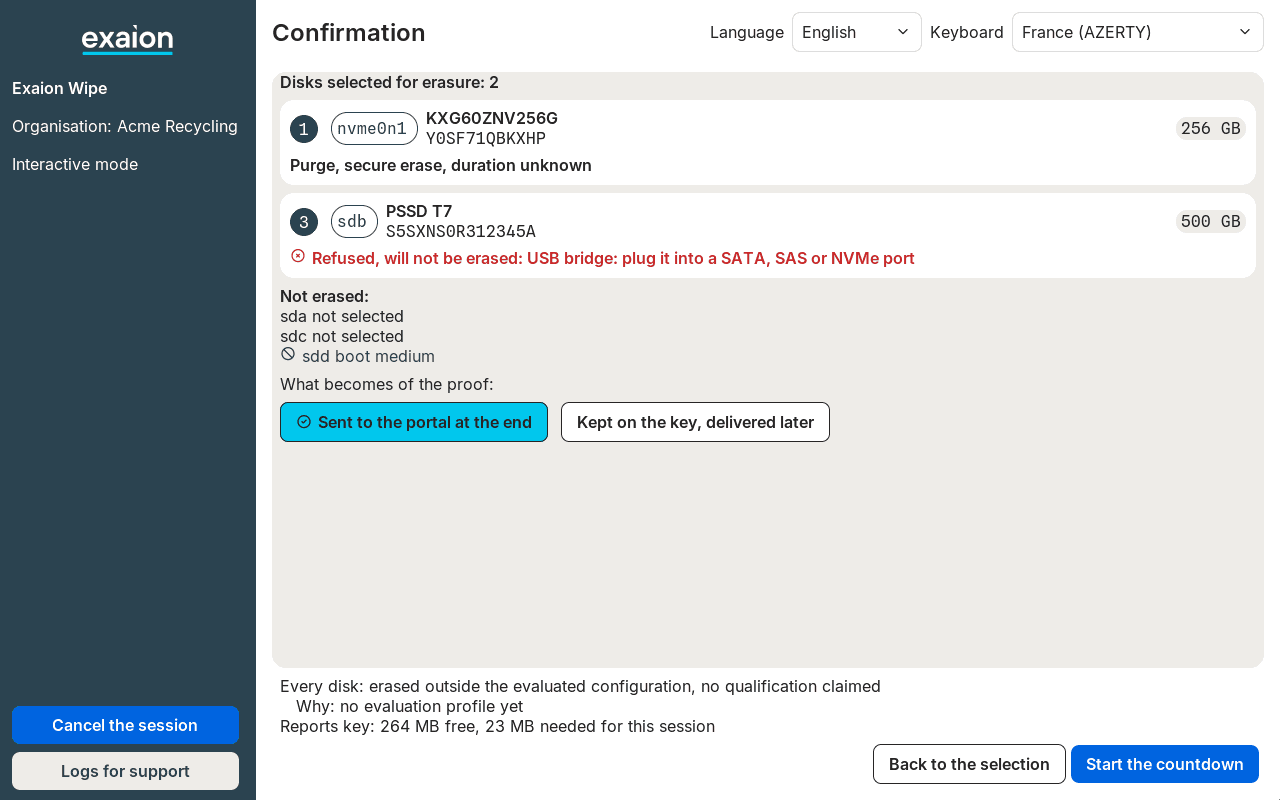
Other disks can be selected but are refused at the confirmation screen, because erasing them
safely is not possible as they are connected. They show
Refused, will not be erased: <reason>, and are not erased. A refused disk does not block the
confirmation: the other disks are erased, and the proof records it as skipped (SKIPPED) with
its refusal reasons. On the closing screen it shows as skipped. Most reasons say what to do. The
selection already warns under such a disk: will be refused at confirmation: <reason>.
| Reason shown | What to do |
|---|---|
RAID logical volume: set the controller to HBA, restart | The disk is behind a RAID volume. Switch the controller to HBA (pass-through) mode and start the agent again |
RAID controller unclear: use another controller | Connect the disk to another controller |
USB bridge: plug it into a SATA, SAS or NVMe port | Only a disk the agent recognizes as a hard disk is erased through a USB adapter. Connect the disk directly |
controller not supported: use another controller | Connect the disk to another controller |
held by an array or volume: stop it, then restart | The disk belongs to a software array or volume. Stop it and start the agent again |
locked: unlock it with its owner's password | The disk is password-locked. Unlock it with its owner's password |
password set: unlock it with its owner's password | Same as above |
write protected: lift the protection, then restart | The NVMe SSD is write-protected. Lift the protection and start again |
write protected: remove the protection | The disk is write-protected. Remove the protection |
shared namespace: erase it where it is reached alone | The SSD is reached by several paths. Erase it in a machine where only one path reaches it |
sanitize running: let it finish, then restart | A previous sanitize is still running. Let it finish and start again |
facts not read: probe it again in a new session | The agent could not read the disk's capabilities. Start a new session |
magnetic or flash not known: it cannot be erased | The agent cannot tell whether it is a hard disk or an SSD |
protocol unknown: it cannot be erased | The agent cannot tell how the disk is connected |
A disk that changes between the confirmation and the start of its erasure (for example, removed or replaced) is not erased either: it ends as skipped, and the proof says why.
Confirm the erasure
The commands below are typed on a console. On the screen, the same choices are buttons, for example Accept the lower guarantee and Start the countdown: see An interactive session, step by step.
In interactive mode, the confirmation screen lists each selected disk with the level, the technique
and, for Clear, the reason, for example Clear, overwrite: no Purge method on this disk. The
other reason is its Purge method is not in this release. Each disk at Clear shows
Lower guarantee: type a <number> to accept it for this disk.
Set the passes, if you need three
Only when a hard disk will be overwritten, the screen offers
Overwrite passes on magnetic disks: p all 1 or 3, p <number> 1 or 3 for one. Type p all 3
for three passes on every hard disk, or p 2 3 for disk 2 only. Skip this step to keep the
count from the session file, or one pass by default (see Prepare a session in advance).
Accept the lower guarantee
Type a and the disk's number, for example a 2. The line then says
Lower guarantee accepted for this disk. When several disks have exactly the same lower
guarantee, the screen offers type a all to accept it for each. If you do not accept a disk,
go back with b and deselect it.
Confirm
Type y. It is refused with Accept or deselect each disk marked lower guarantee first. until
every disk at Clear is accepted or deselected. A countdown of 60 seconds starts; any key stops
it and brings you back to this screen with your choices kept.
Going back with b drops every acceptance. Non-interactive mode asks nothing: it applies Clear
where needed without an acceptance. Its countdown says how many disks that concerns,
Disks erased below the policy's guarantee, with no acceptance in non-interactive mode: <n>, and
the proof records that no acceptance was asked.
How the result is checked
After erasing a disk, the agent reads it back, directly from the disk, never from a copy kept in memory:
- After an overwrite, it reads every block and compares it with what it wrote.
- After a firmware erase, it reads a sample spread over the whole disk: the first and last megabyte and 4096 points between them. The sample can be replayed from a number recorded in the proof. It compares the blocks with the value the SSD says it leaves (zeroes or ones). When the SSD declares no value, the check only confirms that every sampled block reads.
The screen shows each disk as erasing, then verifying, then succeeded or failed.
A disk is succeeded only if every erase step succeeded, the disk was identified again as the
same one, and the read-back passed. Otherwise it is failed, even if the erase command itself
reported success. A single unreadable block fails the disk. Reading the result and the proof: see
After the session.
The agent records the disk's health after erasure but does not judge it, and runs no self-test.
Prepare a session in advance
Fill in the session file once, so the agent knows who carries out the erasure and how many passes to write, without typing it at each session.
After the session
Where the proof goes at the end of a session, what the last lines on screen mean, and how to deliver a proof kept on the stick.