

Prepare the boot medium
Write the agent ISO to a USB stick with a tool that copies it exactly and check the stick, or prepare a reports key to start from a CD or a virtual DVD.
The machine to erase starts from a USB stick that holds the agent. You write the stick once from the agent ISO, then use it on as many machines as you need.
The stick is more than a copy of the agent. It also has a small space, called the reports partition, where the agent saves the proof and the logs of each session. Everything else on the stick is read-only. That is why the way you write the stick matters: the tool must copy the ISO exactly as it is, byte for byte.
What you need
- The agent ISO issued for your organization, downloaded and its SHA-256 compared as described in
Download the agent. The portal saves it as
exawipe-followed by the ISO's identifier, for exampleexawipe-3f2a9c1e-7b4d-4e8a-9c21-5d6e7f8a9b0c.iso: in the commands below, use your file's name. The ISO carries your organization's identity: a stick written from another ISO stops withNo identity on the boot medium: start from a key written from your ISO. - A USB stick of 1 GB or more. Everything on it is erased.
- One of the writing tools below.
Choose a writing tool
These tools copy the ISO exactly:
| Tool | System |
|---|---|
| balenaEtcher (2.1.8 or later on macOS) | Windows, macOS, Linux |
| Raspberry Pi Imager | Windows, macOS, Linux |
| Rufus, in DD Image mode | Windows |
| Win32 Disk Imager | Windows |
dd | Linux, macOS |
Do not use Ventoy, Rufus in ISO Image mode or UNetbootin. They rebuild the stick instead of copying it, and the reports partition is lost. The agent then has nowhere to store the proof and refuses the session.
Check the ISO before writing
This check is optional: comparing the SHA-256 as described in
Download the agent is enough to write the stick. exawipe-verify also checks
Exaion's signature inside the ISO, for when you want more assurance or doubt where an ISO came
from. It only reads the file. If the program cannot run on your computer, for example because
company policy blocks it, skip this check.
You need the ISO's SHA-256, a string of 64 characters shown on the portal beside the download, and the program for your system, listed under Check the stick after writing.
Open a terminal
Right-click the Start button and choose Terminal, or Windows PowerShell. Go to the folder holding the ISO and the program, for example:
cd $HOME\DownloadsCheck
Replace SHA256 with the SHA-256 the portal shows:
.\exawipe-verify-windows-amd64.exe iso exawipe-3f2a9c1e-7b4d-4e8a-9c21-5d6e7f8a9b0c.iso SHA256If Windows shows Windows protected your PC, click More info, then Run anyway: the program is not signed.
Check
In the Terminal, go to the folder holding the ISO and the program, make the program executable,
and run it, replacing SHA256 with the SHA-256 the portal shows:
cd ~/Downloads
chmod +x exawipe-verify-darwin-arm64
./exawipe-verify-darwin-arm64 iso exawipe-3f2a9c1e-7b4d-4e8a-9c21-5d6e7f8a9b0c.iso SHA256
On a Mac with an Intel chip, the program is exawipe-verify-darwin-amd64. The first time, macOS
stops it: allow it as described in Allow the program, the first time.
Check
Replace SHA256 with the SHA-256 the portal shows:
chmod +x exawipe-verify-linux-amd64
./exawipe-verify-linux-amd64 iso exawipe-3f2a9c1e-7b4d-4e8a-9c21-5d6e7f8a9b0c.iso SHA256
exawipe-verify shows one line per check:
ok ISO hash is the portal's
ok manifest read
ok identity zone read
ok manifest signed by a known publication key
ok manifest matches the identity zone
ok system (squashfs) hash is the manifest's
OK: the ISO is the one the portal served and its manifest is signed- OK: write the stick.
- FAILED: the line says which check failed. Do not write an ISO that fails the check: download it again from the portal and check it again.
The ISO carries a manifest, signed when the portal issued the ISO, that lists the SHA-256 of the
system and of your organization's identity. exawipe-verify checks the signature with Exaion's
publication key, built into the program, then recomputes both values. It stops with exit code 0
when every check passed, 1 when one failed, 2 when the ISO file cannot be opened or read, and
64 on a wrong command.
Write the stick
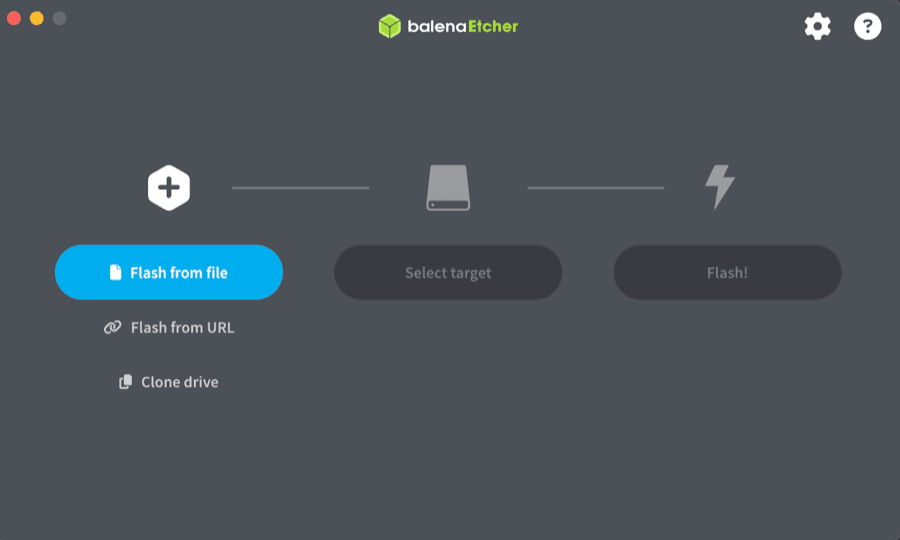
Open the ISO
Start balenaEtcher and click Flash from file. Choose the agent ISO.
Choose the stick
Click Select target, tick the USB stick and click Select 1. Check its name and size: everything on it will be erased.
Write
Click Flash! and wait for Flash Completed!.
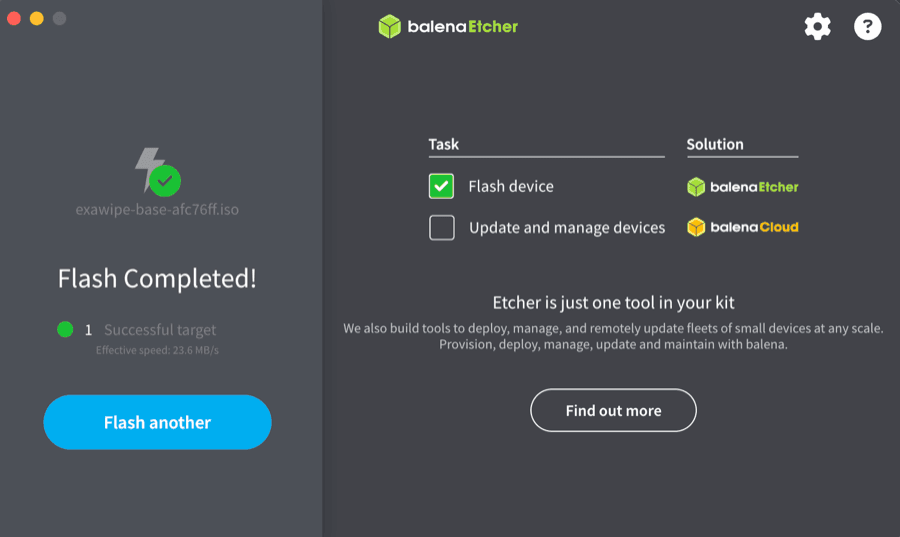
On macOS, use version 2.1.8 or later: version 2.1.7 cannot open the file.
Skip the device choice
Start Raspberry Pi Imager. Under Device, choose No filtering, then Next.
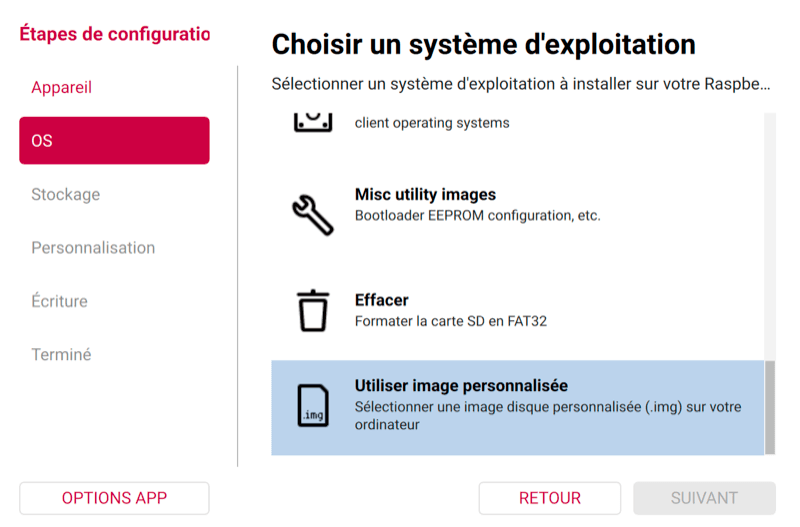
Choose the stick
Under Storage, choose the USB stick, then Next.
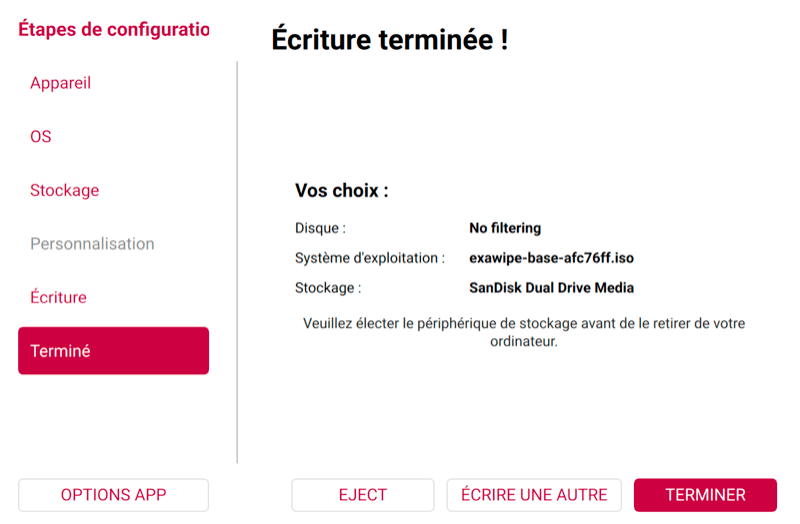
Write
Click Write, confirm that everything on the stick will be erased, and wait until Imager says the writing is finished.
Choose the stick
Start Rufus and choose the USB stick under Device.
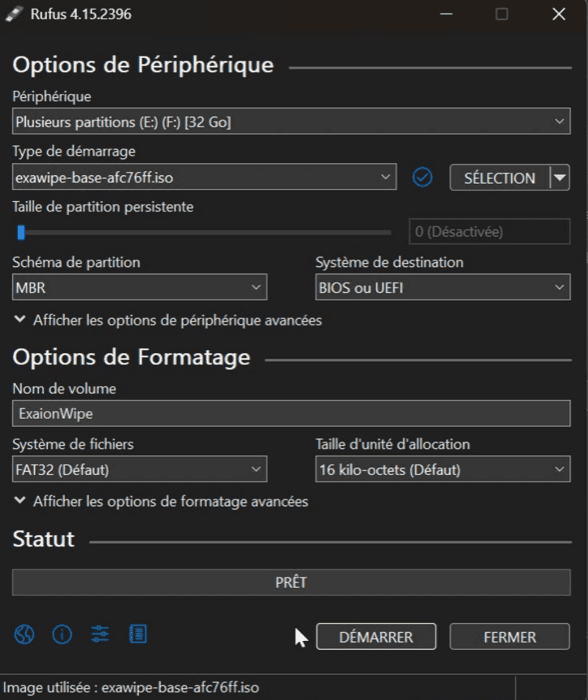
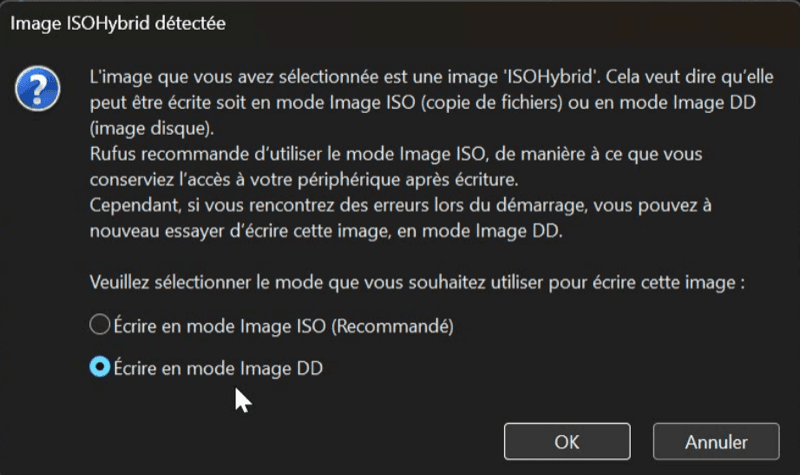
Choose DD Image mode
Rufus says it detected an ISOHybrid image and asks how to write it. Choose Write in DD Image mode, then OK. Do not keep Write in ISO Image mode (Recommended): the stick would not start.
Confirm
Rufus warns that everything on the stick will be erased. Confirm and wait until the status shows READY.
Open the ISO
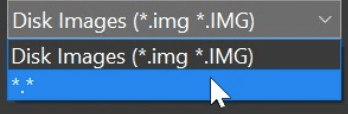
Start Win32 Disk Imager and click the folder icon next to Image File. In the file window, change the filter Disk Images (*.img *.IMG) to *.*, otherwise the ISO is not listed. Choose the agent ISO.
Choose the stick
Under Device, choose the drive letter of the USB stick.
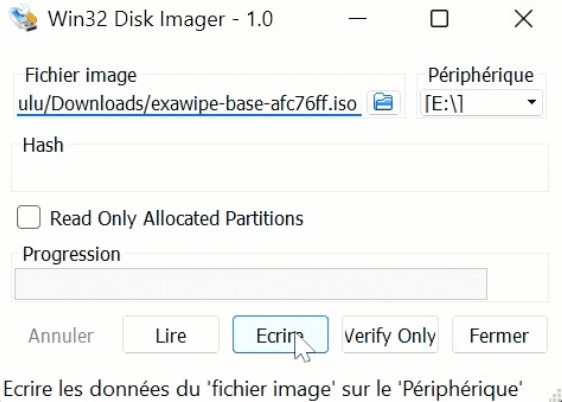
If the writing stops with an access error, open Disk Management in Windows, delete every volume of the stick, create a single new volume on it (any file system), then write again.
Find the stick
Run lsblk before and after plugging the stick in. The new disk, for example /dev/sdb, is the
stick. Check it twice: dd overwrites the target without asking.
Write
Replace /dev/sdX with the stick's name, the whole disk and not a partition such as
/dev/sdb1:
sudo dd if=exawipe-3f2a9c1e-7b4d-4e8a-9c21-5d6e7f8a9b0c.iso of=/dev/sdX bs=4M status=progress conv=fsyncFind the stick
Run diskutil list and find the stick, for example /dev/disk4. Check its size twice: dd
overwrites the target without asking.
Unmount it
diskutil unmountDisk /dev/diskNWrite
Use /dev/rdiskN, with the same number:
sudo dd if=exawipe-3f2a9c1e-7b4d-4e8a-9c21-5d6e7f8a9b0c.iso of=/dev/rdiskN bs=4mdd shows nothing while it writes. Press Ctrl+T to see how far it has gone.
After writing, Windows shows the stick as two drives, and macOS shows a drive named WipeReports. Both are normal. Never accept to format or initialize the stick: that erases the agent.
Check the stick after writing
This check is optional. A stick written with one of the tools above is normally an exact
copy of the ISO. Check it if you have a doubt, or if the stick does not start: exawipe-verify
reads the stick back and compares it with the ISO. It only reads, and never changes anything on
the stick. If the program cannot run on your computer, skip this check.
exawipe-verify is one program per system:
| System | Program |
|---|---|
| Windows | exawipe-verify-windows-amd64.exe |
| macOS, Apple chip (M1 or later) | exawipe-verify-darwin-arm64 |
| macOS, Intel chip | exawipe-verify-darwin-amd64 |
| Linux | exawipe-verify-linux-amd64 |
Download the program for your system from the portal, in Settings → Agent & tools, beside the agent's ISO: client admins and client technicians can download it. Compare its SHA-256 with the one shown beside it, as for the ISO.
Find the stick's number
Right-click the Start button and choose Disk Management. The stick is the disk marked Removable, for example Disk 2: its number is 2. If Windows offers to format or initialize the stick, answer Cancel.
Open a terminal as administrator
Right-click the Start button and choose Terminal (Admin), or Windows PowerShell (Admin). Go to the folder holding the ISO and the program, for example:
cd $HOME\DownloadsCheck
Replace N with the stick's number:
.\exawipe-verify-windows-amd64.exe stick exawipe-3f2a9c1e-7b4d-4e8a-9c21-5d6e7f8a9b0c.iso \\.\PhysicalDriveNIf Windows shows Windows protected your PC, click More info, then Run anyway: the program is not signed.
Find the stick
In the Terminal, run diskutil list and find the stick, marked external, physical, for
example /dev/disk4.
Check
Go to the folder holding the ISO and the program, make the program executable, and run it on
/dev/rdiskN, with the stick's number:
cd ~/Downloads
chmod +x exawipe-verify-darwin-arm64
sudo ./exawipe-verify-darwin-arm64 stick exawipe-3f2a9c1e-7b4d-4e8a-9c21-5d6e7f8a9b0c.iso /dev/rdiskN
On a Mac with an Intel chip, the program is exawipe-verify-darwin-amd64.
Allow the program, the first time
The program is not notarized by Apple, so macOS stops it the first time and says it could not verify it. Click Done, open System Settings, Privacy & Security, and click Open Anyway next to the program's name. Run the command again and confirm with Open Anyway.
If the program then stops with operation not permitted on the ISO, macOS keeps the Terminal
out of the Downloads folder, and sudo does not change that. Open System Settings,
Privacy & Security, Files and Folders, and turn on Downloads Folder under
Terminal. Or move the ISO and the program to another folder, such as your home folder.
Each time the stick is written or plugged in, macOS may show The disk you attached was not readable by this computer, once or twice. That is normal: one of the agent's partitions is not meant for macOS. Click Ignore, never Initialize, which erases the stick.
Find the stick
Run lsblk and find the stick, for example /dev/sdb: the whole disk, not a partition such as
/dev/sdb1.
Check
chmod +x exawipe-verify-linux-amd64
sudo ./exawipe-verify-linux-amd64 stick exawipe-3f2a9c1e-7b4d-4e8a-9c21-5d6e7f8a9b0c.iso /dev/sdX
exawipe-verify reads as many bytes as the ISO holds, then shows one line per part of the stick:
Reading the first 832905216 bytes of /dev/rdisk8...
Partition tables, boot code            0..276480      identical  (must be identical)
EFI partition                     276480..3684352     identical  (may differ)
System (squashfs)                3684352..555745280   identical  (must be identical)
Reports partition              555745280..824180736   identical  (may differ)
Identity partition, end        824180736..832905216   identical  (must be identical)
OK: every zone that must be identical is- OK: the stick is ready.
- FAILED: the stick is not a copy of the ISO. Write it again; if it fails again, use another tool or another stick.
- is not an external removable disk (Windows, macOS) or is not a removable disk (Linux):
the stick tells the system it is a fixed disk, as some fast sticks and USB SSDs do, and
exawipe-verifyrefuses to read it. Write and check another stick, a plain USB stick.
The EFI and reports partitions may show DIFFERENT: Windows writes into them as soon as it sees
the stick, and the agent does not need them unchanged. Every other part must be identical.
exawipe-verify stops with exit code 0 when the stick is good, 1 when a part that must be
identical differs or the stick is smaller than the ISO, 2 when the ISO or the stick cannot be
read, or the system does not report the stick as a removable disk, and 64 on a wrong
command. It compares the parts of the stick at the boundaries written in the ISO's own
partition table.
Start from a CD or a virtual DVD
You can also start the machine from the ISO as a CD, a DVD or the virtual DVD of a management card (iLO, iDRAC or XClarity). Some management cards, such as the iLO 4, offer no other way. A CD has no place to keep the proof. Before such a session, write a reports key once, and plug it into the machine beside the CD.
- Started from a USB stick, the agent ignores a reports key plugged in beside it and never erases it.
- One reports key at a time: with two, the session is refused.
- With no reports key and no USB stick, the agent refuses the session before erasing anything:
No reports partition: start from a USB key of the ISO, or plug in a reports key.
Technical details
The wipe agent
What the wipe agent does, what you need to use it, how a session runs and where to start in this part of the guide.
Start a server through its management card
Start a server from the agent ISO through its management card (iLO, iDRAC, XClarity), keep the proof on a reports key and follow the session from the serial console.